Simple Workflows
- DJ Antinucci
- May 9, 2023
- 3 min read
Updated: May 17, 2023
Simple workflows (also known as pre-defined workflows) are bulk automation tasks that will create objects in bulk. Simple workflows are also singular in nature – meaning only one type of object (IP Set, dFW Rule, etc…) per workflow. Similar to other workflows, CSV import, pre-staging of configs and rollback (undo) are supported.
Minimum Release: 1.0
Application: NSX-v, NSX T
License: Enterprise
Privilege level: Engineer or higherIn this article
Article Contents:
1. Feature Description
2. Setup
3. Select Workflow
4. Create Object(s)
5. CSV Templates and Storage
6. Completing a workflow
7. Managing saved workflows
8. Launching a workflow
9. Rollback
Setup To top
No setup required. Once a data source (NSX-v or NSX T) is added, this feature is enabled.
Select Workflow To top
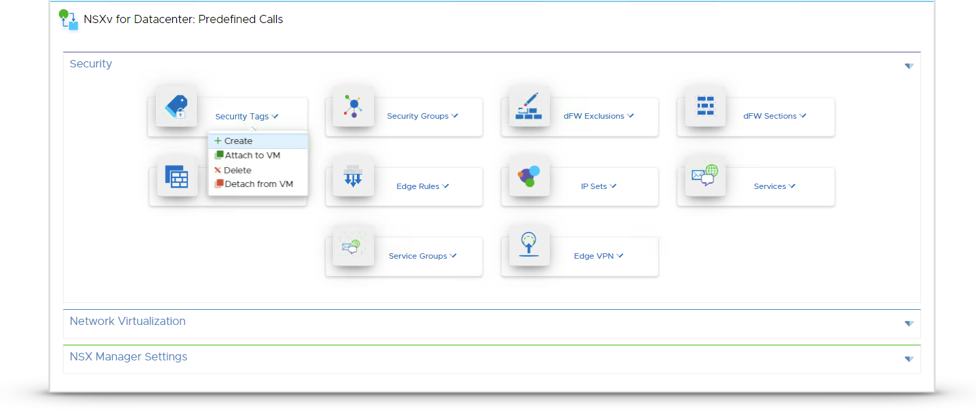
To begin using Simple Workflows, navigate to the main dashboard and select and object type to created or edit from Security, Network Virtualization or System (NSX Manager) categories. In this example, the task is to create 15 security tags against NSX-v.

Create Object(s) To top
For every workflow, manual or bulk creation options are provided. Below are two examples illustrating manually creating 5 Security Tags and importing 10 from a pre-defined CSV.


ℹ️ Clicking “Create Security Tag” in this example does NOT carry out any of these actions against NSX Manager. The values are being validated and loaded into the Configuration Preview window.

Users can continue to create more objects to queue them for processing or continue to the next step of the workflow to review prior to publishing to NSX.
CSV Templates and Storage To top Every object type (Security Tag, IP Set, etc…) has a corresponding downloadable template with sample data for reference.
CSV templates are available within each workflow type. The template can be downloaded for data input and then uploaded directly into the workflow itself. Below is an example of a Security Tag template provided.

Completed CSV files can also be stored on-box for quick reference or as a “golden template” for repeatable builds that require objects to be accurate each time. To access previously uploaded or to manage the CSV files, navigate to Admin > Files.
ℹ️ Enterprise Admin permissions are required to add, edit or delete on-box CSV files. Other users can only reference them in any given workflow.

On the Files page, upload, download, view and edit functions are available. Additionally, there is a templates bundle available for download that contains all of the pre-defined system templates with sample data.
Completing a workflow To top
Once all the data has been entered, continue to the next step of the workflow by clicking Next in the top right corner of the workflow. This will bring the user to job preview screen where the session can be saved for immediate or future execution. In this example, we will save the job as Create Security Tags.

ℹ️ XML or JSON preview toggling is supported for every API call
ℹ️ Users can copy / export the API calls and contents for use in 3rd party tools or their own custom scripts
At this point, the user can navigate away from the workflow to return at a later date. The job is saved and can be launched from the purple pull-out tab on the top right of the page.

⚠️ Saved jobs are stored on the ReSTNSX appliance for 45 days. Note that the jobs are NOT saved in the event of an upgrade.
Managing saved workflows To top
Enterprise Administrators can delete any previously saved workflows by navigating to the Saved Workflow tab and clicking the Manage button.


Launching a workflow To top
When selecting a job from the saved jobs menu, the user is returned to the same job preview screen as before where the job can be run. Upon clicking Publish, the API calls are executed with verbose logging and progress indicators against the active data source (NSX, vCenter, etc…).

Job Metrics
Processing – the number of objects that have been processed by ReSTNSX and are ready to be created, edited or deleted.
Jobs Complete – the number of objects from the total processed that were successfully created, edited or deleted. The resultant object names, IDs and API return messages are stored in the More Info button once the job is completed.
Errors – the number of objects from the total processed that were not created, edited or deleted. The processed objects that failed are stored in the More Info button once the job is completed.
Once this job is complete, the results can be validated directly on the data source itself or within ReSTNSX. In our use case, we use the ReSTNSX Query on the right hand side of the application to validate the objects were indeed created.

Rollback To top
Up to 45 days after the job has been run, users can return to the same saved job to rollback (undo) any create or edit publish by clicking the Rollback button on the publish screen.
⚠️Rollback of workflows where objects were being deleted are not supported. Once an object is deleted, it cannot be recovered.

Please provide me redim code